Tag: felt

Craft Fair Goodness/Madness!

I was shocked to see that it’s been over 2 months since my last blog — the days have melted into weeks and here we are, snowflakes flying and craft fairs happening!

I’m going to be selling my work at the Christmas Made by Hand Craft Show in Hamilton on December 6th and 7th. It’s my first big fair, they expect about 3000 people over the 2 days! I am excited/nervous. And I have absolutely no idea how much product to make, not knowing the lay of the land at all. So I’ll either sell out (which would be amazing) or I’ll have product for my Etsy shop afterwards (which would be fine). Either way, I probably won’t want to sew another stitch for a long time by the time next week rolls around.

Faceless dollies (a bit creepy actually!) laid out for colour matching.

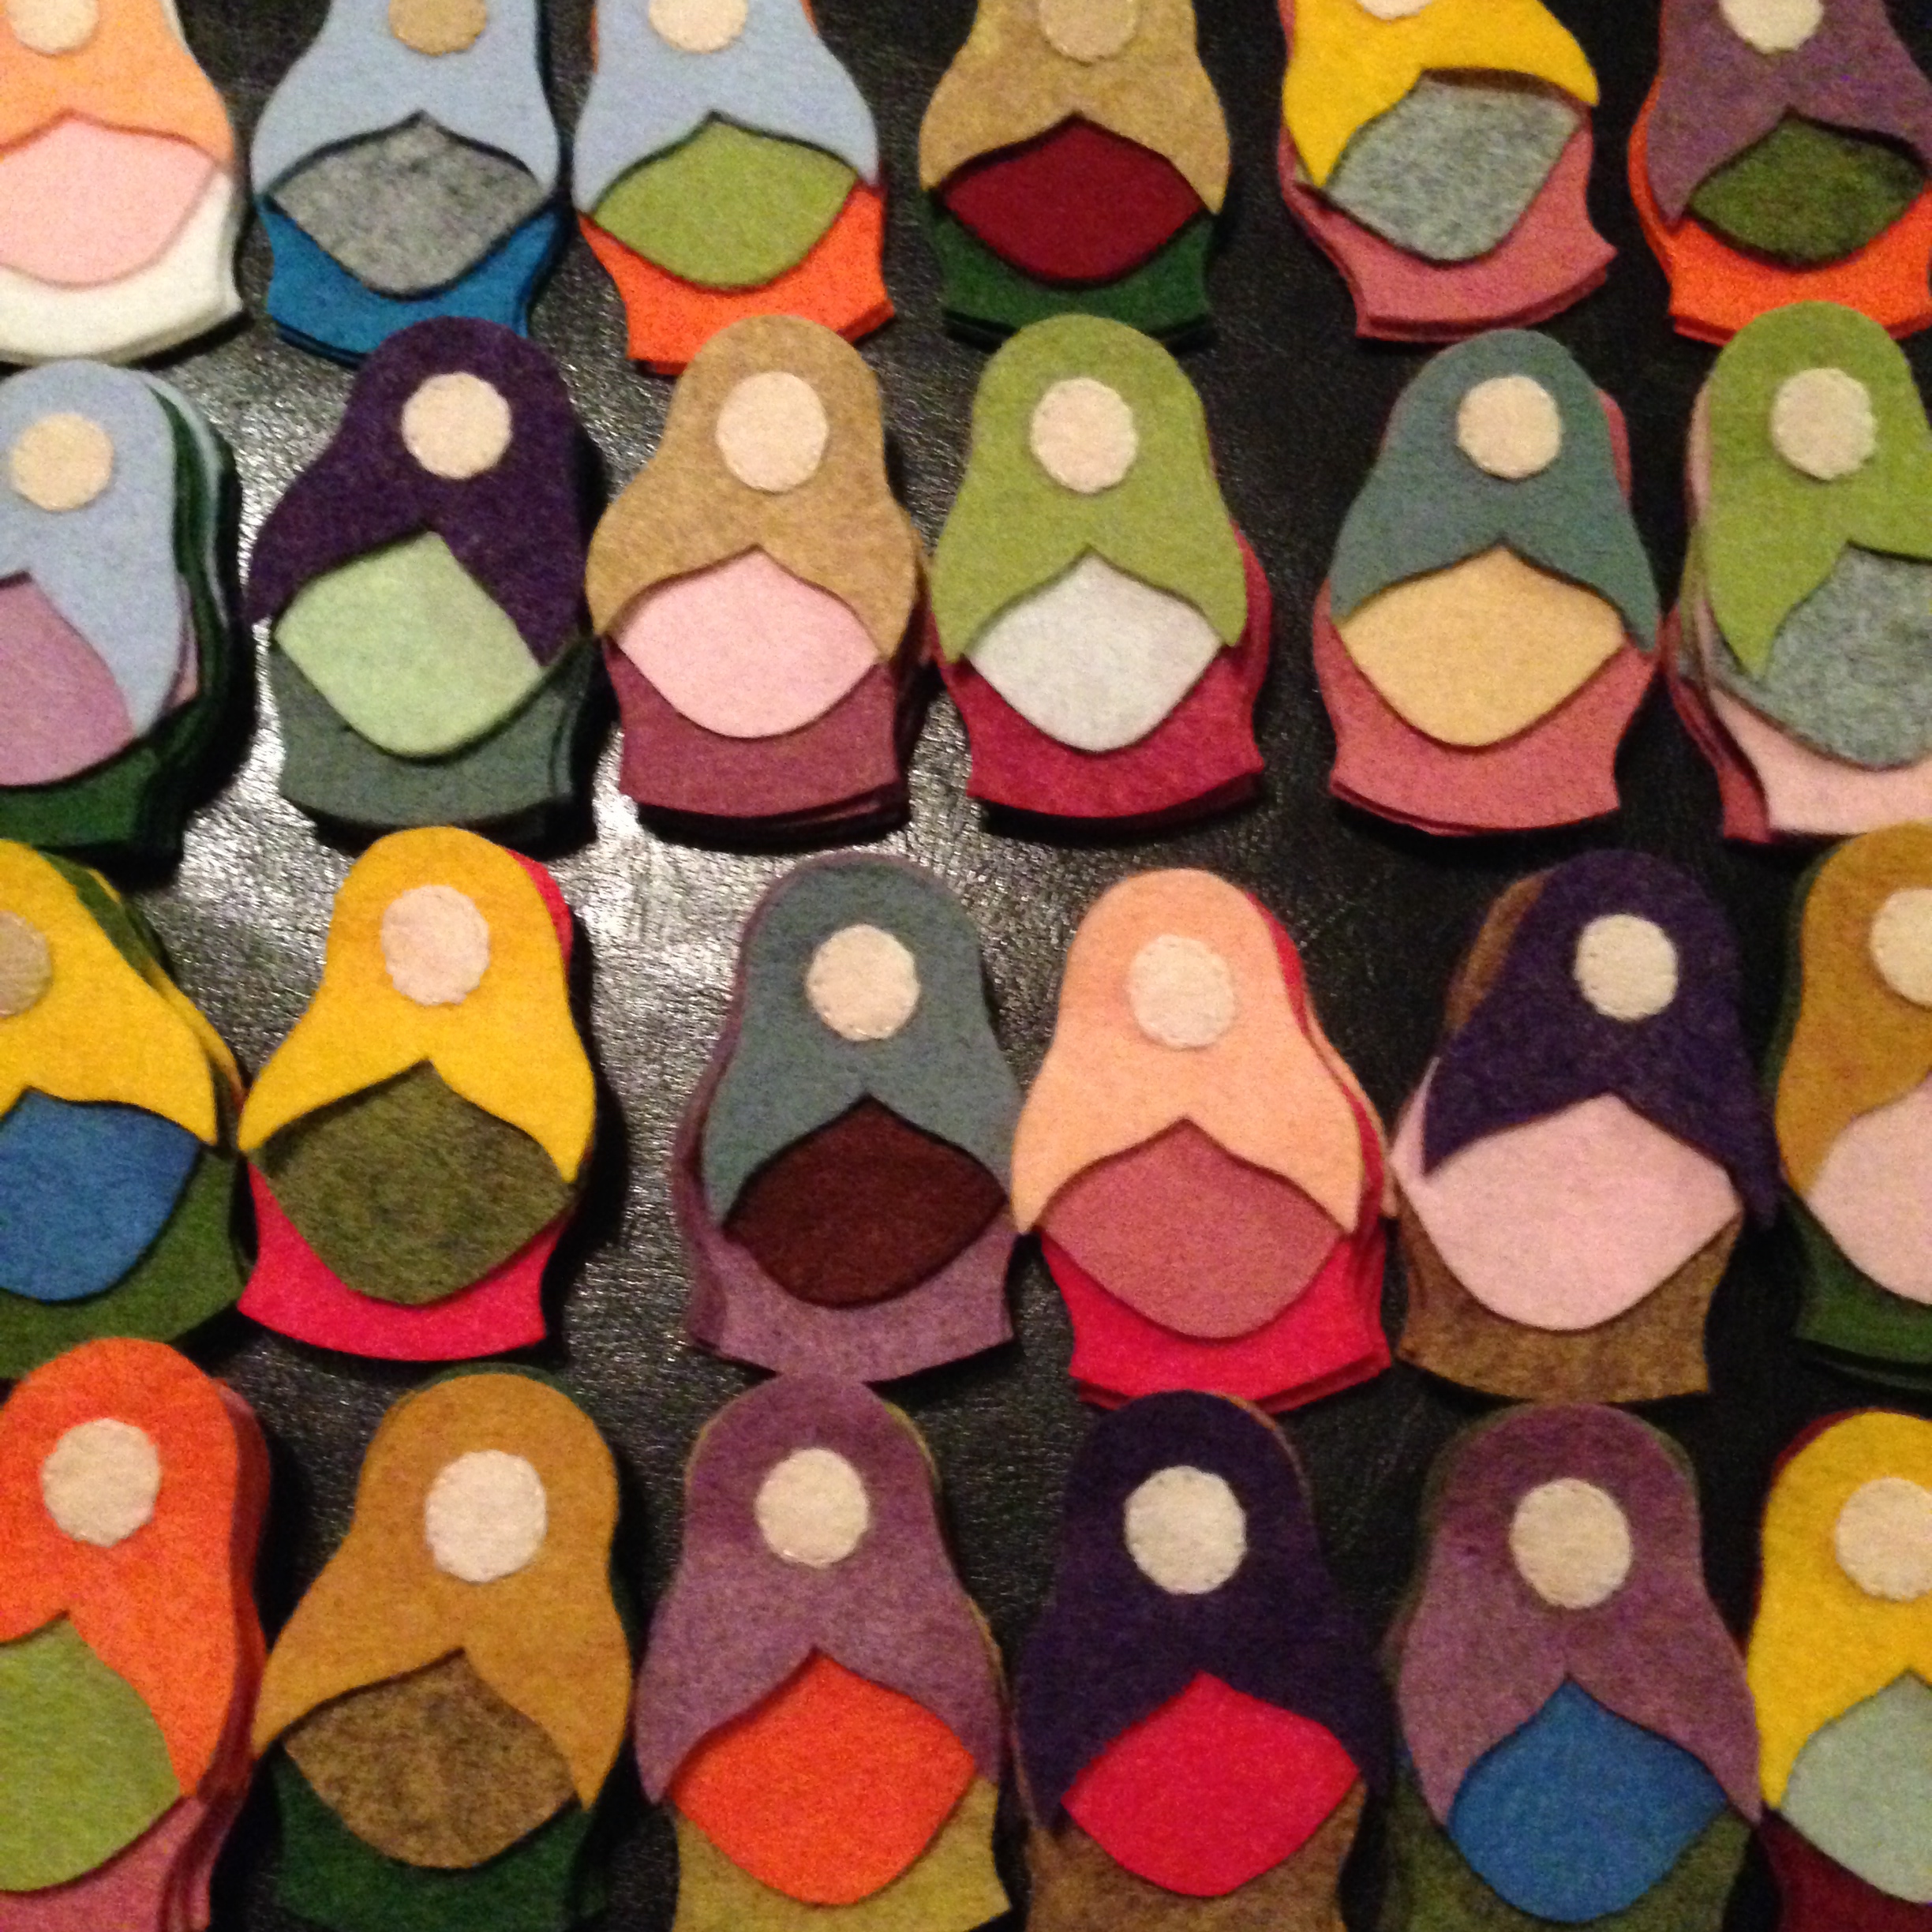
I’ll be carrying small and large matryoshka dolls, treasure maps, baby quilts, burp cloths, soother/toy straps, mitt clips and lavender sachets. Whew! I’m on the strange high most textile artists and makers will recognize: a heady mix of sleep deprivation, terror as the production schedule gets modified down to match the slipping days, and excitement at the possibility of sharing my work.

Lots of Dollies
A lot of little matryoshka ladies!

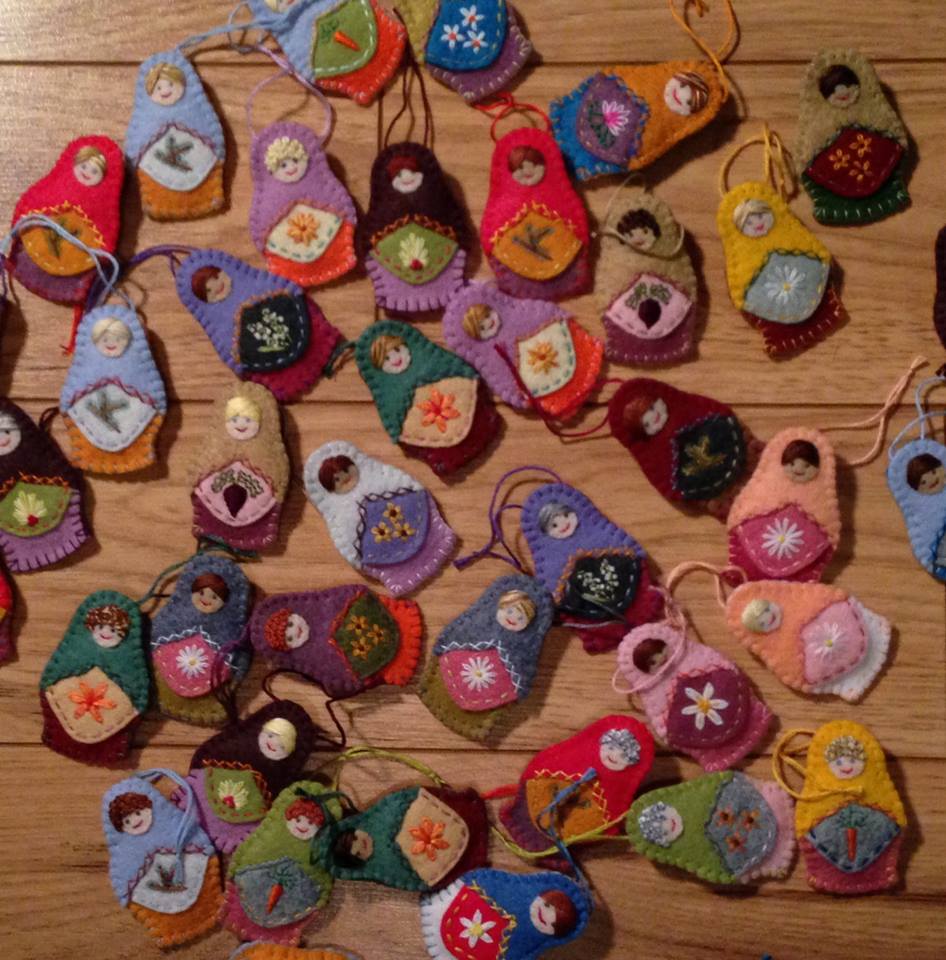
It was a year ago this month that I casually shared a photo of my latest project – these little dollies – on social media, and had an overwhelming response! I sold about 60 custom dolls last holiday season. So I got ahead of the ball this year and made a bunch already!

If you are in or near Hamilton, come to the Made by Hand Show on December 6th or 7th! I’m sure there will be many wonderful treasures. I’ll aim to share some of my new quilts and burp cloths before next weekend so you can see what I’m up to while the midnight oil burns … til then, cheers!


Rearview Fridays: Felt Pentagon Ball

I am excited about this Rearview Fridays post — it’s a very old project, I made this  felt pentagon ball when I was about 10! Earlier this year I wrote about some toys, balls and animals, that I’d made when I was in grade 4. And this is the ball I couldn’t find to include in that post, it’s the 5th toy I made that year.

This one is really precious to me, I was so proud of it. First I stitched the five-petaled flowers on each of the 12 pentagons and then sewed all 12 pieces together, by hand of course (it was Waldorf school after all)! It’s stuffed with fleece and has a bell in the middle. I’m sure there was a math lesson attached to this creation in addition to the sewing aspect! I do remember thinking I wanted to keep it for when I had kids (I was a planner!) and I managed that — both the having kids part and the keeping the ball bit! Gene and I tossed it around yesterday and he loves the bell.

I’m blowing kisses into the past towards my younger self, planning, stitching, filling a cold day with a delightful project, just as she would be 25 years later.

Free Pattern: Candy Corn Bunting How-To

I love Candy Corn. Not really to eat, I actually find it cloying and a bit meh, but I LOVE how it looks! I was inspired by a September post on The Purl Bee for these charming knitted candy corns. This halloween is going to pass me by before I manage to knit one, but come 2013, look out!

Anyways, it got me thinking how candy corn is a great decoration. And I also love me a good bunting (aka garland or pennant strand). And I thought: candy corn bunting! I googled to see what was out there — and there are lots, but none that I really loved. So I made my own. And I decided to share it with you! You can click HERE for the free pattern. I am no photoshop wizard, I aspire, but I cobbled this together and hope it inspires all sorts of candy corn bunting glory!

1. I grabbed some craft felt ends I had lying around and cut my candy corn pieces. In this case I’d decided I’d go with seven pieces on the strand, so I needed seven pieces of each colour.

2. a. Using a wide, tight zig-zag stitch, I attached the candy corn pieces together. I kept the pieces flush and the seam line right in the middle so that the zig-zag grabbed both sides of the felt.

2. b. I used orange thread between the white and orange pieces and yellow thread between the orange and yellow pieces.

3. Next I measured out a piece of 1″ wide brown ribbon (bias tape works well too) to length. Because the felt candy corns are 3″ wide at their widest point and I wanted 2″ in-between each corn, I calculated 5″ for each corn, plus an extra 15″ on each end to allow for securing the finished bunting. So with my seven-piece candy corn bunting, I cut a length of approximately 65″.

4. Next, I pinned my finished candy corns onto the ribbon, about 2” apart. In this case I pinned them halfway up the 1″ ribbon and folded the ribbon over the felt so the finished ribbon is 1/2″ wide. Then I sewed ’em down with a zig-zag stitch.

5. Lastly, I made some loops on the end of the ribbons so that the bunting can hang from hooks or tacks. I also left the ends long enough that they can tie. I used yellow thread on the brown ribbon. Kind of Charlie Brown-ish, love it.

Download the CANDY CORN BUNTING PATTERN right here for free! If you make one, send me a picture, I’d love to see how it evolves.

This little candy corn bunting was bound for a dinner party at a dear friend’s house. Here it is in it’s little glory, sitting above a delectable fall feast! Happy candy corn season folks.

CANDY CORN BUNTING PATTERN – a free download!

Rearview Fridays: Grade 4 Toy Glory

When I was in grade 4 I was ambitious craft-wise. Herm. I should modify that statement. I have always been very ambitious crafty-wisey. So when I was however old one is in 4th grade, 10-ish I guess, I made some toys. And surprisingly they have lived to tell the tale and play another day!

I stitched this little felt ball, about the size of a generous hacky-sac. Soft and well balanced for throwing at the head of a little brother without dire repercussions! Check out the well-spaced blanket stitching. Pretty good for little pioneer-aspiring hands.

I was in Waldorf and I seem to remember making all of these toys at school. So there’s a good chance the one above involved a lesson on fractions! In fact I remembered these toys when I found a felt ball from the same era made of a bunch of pentagons (like a soccer ball) with little flowers stitched onto each piece. Now I can’t find that ball, go figure. But it reminded me to dig these out of the toy box for a way-retro Rearview Friday post.

This one I crocheted back when I knew how to crochet. Yes, my 10-year-old Waldorf-self had a wider palette of crafty skills than I do now. I think it was referred to as the Brain Ball for obvious reasons.

Then there were the animals. Next up is mister floppy-ear bunny. The detail makes me shake my head, I was fussy. The stitching is tiny, he has a proper pom-pom tail. The rabbit is even weighted with seeds or rice for heaven’s sake. And of course the fibres are all-natural, it was Waldorf after all! I do still loooove me some natural fibres …

I have 3 significantly younger siblings and all the toys in this post made it through their play years and are now being enjoyed by my own boys over 20 years later. It just amazes me to think that I made toys that would be in the hands of my own wee people when I was still a girl.

I had to save the best for last. Check out this donkey! His legs even have shaped joints. His embroidery floss mane has seen better days but what do you expect after almost 25 years?! I was a goody-two-shoes in grade 4, actually for a lot of grade school til I got over myself circa high school, but I think I partly made a donkey so I could say “ass” legitimately but titter behind my serious-face. Ass.

I love that the act of making something leaves a memory in your muscles. I hold these toys and truly remember making them. Cheers to crafting at any age. Cheers to crafts that last.

Have a very happy weekend and raise a glass to Canada on July 1st.

The Final Felting

I’ve been working on a fun and inspiring costuming gig for the past few weeks. You can check out earlier parts of the project here and here. Above are the super charming Peacock Clips that will clip on the front of emerald bodysuit/tutu combos. They’ll be accompanied by the headbands below:

I am in love with the Peacock pieces. Who doesn’t love the rich and unexpected colour combos in a Peacock feather — and it works so well in felt.

Next, Goldfish! They are brooches that will sit at the turquoise hips of each wee dancer. And note the awesome cutting mat and Olfa rotary, dang I’m loving them!

Followed by little tuxedo-inspired bibs that go with top hats and gloves for a tap dance number. I wasn’t sure I liked my idea on this one and then in reality, it’s a contender for favourite, I think it’s totally charming! Could be great in cotton as a baby bib, hmmmm …

Here’s a work in progress shot of the pieces for the elegant grey and cream flowers for the Flower Waltz dance. They will sit against plum coloured suits:

And the finished products. My first “S-fold” flowers were very satisfying to make. I appreciated the fickle pickle’s tutorial. I ended up hand stitching my flowers rather than gluing them and used felt circles rather than buttons in the middle, but she unravelled the mystery for me and got me rolling — and that’s why I love crafty bloggers. Three cheers for sharing!

And lastly, most sweetly, I leave you with a bowl of candy. Felt candies. But don’t them look delectable? I caught Rudi licking them, riiiiiight. They ended up being strung along ribbons and hung shoulder to shoulder and shoulder to hip on little dancers in royal blue. And then one pink and one blue candy each on barrettes in their hair. My teeth are aching from the sweetness.

Thanks to Kitty Ballistic for the joyful, colourful idea and for the tutorial. I see more of these in my decorating future …

More Felt: pinwheeling, flapping, waltzing

I am buried in the costuming job that I mentioned last post. I’m having so much fun! Miles of thread have been wound and stitched and the cuteness continues to reveal itself. Here are some of the finished pieces so far.

Felt pinwheels, one for each shoulder against a red tutu, how cute will that be?!
The Pizzicato Polka dancers get geometric headbands with their pinwheel brooches. This headband is one of my new favourite things to make, so easy. So hip! I kind of want an adult sized one.
Little Flapper headbands — they’ll have black pearl necklaces tied in a knot and big felt flowers at their hip too. My teeth hurt from thinking about the cuteness!
Petal headbands for wee flower-waltz dancers.
Felt crowns for the Aquarium dance — they go with a turquoise bodysuit and tutu, then a palm-sized goldfish will pin on the hip. I think turquoise and orange is one of my favourite colour combos ever! Almost finished, just gotta hand stitch the bottoms closed. Better get back to it …

Adventures in Felt Costuming

I’m working myself silly on a fantastic costuming gig for Movement Lab dance studio in Toronto. I’ve known the director Ann-Marie Williams through the dance community for years, our paths crossed as students and professionals dancing and administrating our favourite art form! So when she asked me to do all the decorating pieces for the basic tutus and bodysuits she had for her show I jumped at the opportunity.

No frilly, nauseating princessy-ness here, no ma’am! All the pieces are being made from felt, glorious felt! Wherever possible, the pieces (like the gold fish above) will be attached to a brooch pin or a barrette or a headband so that they can also be used afterward, separate from the costume.

I’m off to a good start and will have some finished pieces to share next week. Now back to the machine with me!